That semi-permanent manicure has been a trooper. For weeks, it’s given you flawless, chip-free nails without a single touch-up. But nothing lasts forever, and the time has come to part ways. Maybe there’s noticeable regrowth, or you’re just craving a fresh color. Whatever the reason, removing it properly is crucial for your nail health.
Why You Shouldn’t Just Wait It Out
While semi-permanent polish is durable, leaving it on for too long can lead to problems. As your nails grow, the gap between the polish and your cuticle widens, creating a potential entry point for moisture and bacteria. This can lead to infections. Furthermore, the polish can start to lift and peel on its own. If you pick at it, you risk peeling off layers of your actual nail, leaving them thin, weak, and vulnerable.
The best practice is to remove your semi-permanent polish after two to three weeks, or as soon as you notice significant lifting.
How to Remove Semi-Permanent Polish Safely?
There are a few ways to remove your manicure. The key is patience and care to avoid damaging your natural nails.
1. The Soak-Off Method (The Gold Standard)
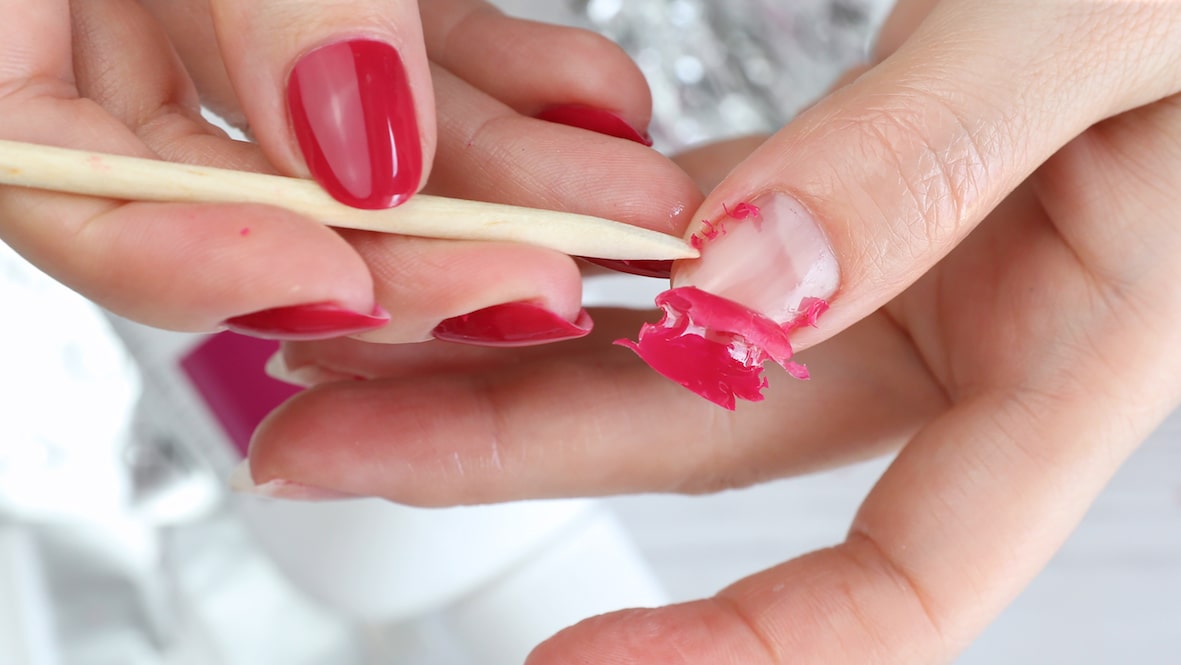
This is the most common and highly recommended at-home method. It requires acetone, which is the only thing strong enough to break down the semi-permanent polish.
* What you’ll need: 100% pure acetone (not regular nail polish remover), cotton balls, aluminum foil, a cuticle pusher (wooden stick), and a coarse nail file.
* Steps:
1. File the Top Layer: Gently file the shiny top coat off each nail. You don’t need to remove the color, just scratch the surface. This allows the acetone to penetrate.
2. Soak and Wrap: Soak a small piece of cotton ball in acetone and place it on your nail. Wrap a small piece of aluminum foil securely around your fingertip to hold the cotton in place.
3. Wait: Sit back and relax for 10-15 minutes.
4. Gently Scrape: Unwrap one finger. The polish should look crinkled. Use the cuticle pusher to gently scrape off the softened gel. If it doesn’t come off easily, re-wrap it for another 5 minutes. Never force it!
5. Hydrate: Acetone is very drying. Once all the polish is off, wash your hands and massage a rich cuticle oil or hand cream into your nails and skin.

2. The File-Down Method (Use with Caution)
This method involves manually filing the polish off and is best left to professionals. If you attempt it at home, extreme caution is needed.
* What you’ll need: A coarse-grit nail file (180 grit or higher).
* Steps:
1. Gently File: Using the file, gently buff the surface of the polish. The goal is to file it down until only a very thin, faint layer remains.
2. Do Not Over-File: This is the biggest risk. The moment you feel the file catch on your natural nail, STOP. Filing into your natural nail will cause significant thinning and weakness.
3. Buff Smooth: Once only a thin layer is left, you can either soak it off quickly with acetone or buff it smooth with a finer nail buffer. Follow with oil.
3. The E-File Method (For Professionals Only)
This is the fastest method, but it should only be performed by a trained nail technician.
* How it works: A nail technician uses an electric nail file (e-file) with a special drill bit to quickly and precisely remove the bulk of the polish.
* Why leave it to the pros? E-files are powerful and can cause serious damage, including burns, cuts, and severe nail thinning, in untrained hands. A professional knows exactly which bits to use and how much pressure to apply to remove the polish without harming the natural nail underneath.
The Bottom Line
For a safe and healthy removal, the at-home soak-off method is your best bet. It requires a little patience but protects your nails. If you’re ever unsure, or if your nails are already feeling weak, the safest option is always to visit a salon for a professional removal.
Your nails deserve a break! Give them some TLC after removal with a hydrating treatment, and they’ll be ready for your next manicure adventure.